With age, facial skin becomes saggy, and not only because facial muscles weaken and collagen and elastin production decreases. There is one more reason that causes aging: the dislocation of the facial bones. As a result, the oval face is more blurred and the cheeks and chin are flabby.
However, a Japanese named Chiyo Hayashi did a great job of trying to solve this problem. He has developed a special facial massage technique that helps restore the initial position of the skull bones and improves microcirculation in the facial tissues. This system was called Korugi.
We have learned how to do this type of massage correctly and we look forward to sharing this knowledge with you. Don’t miss our interesting bonus at the end of the article!
An Important Note!
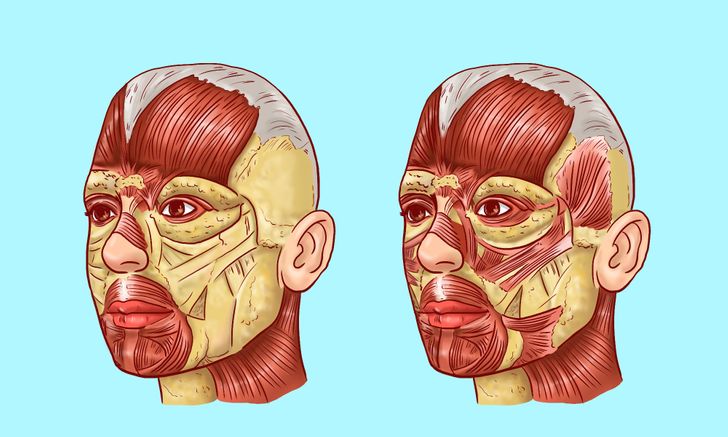
Muscle tone decreases over the years and fat is redistributed. In youth, fat forms a homogeneous layer, but in old age it begins to accumulate in certain areas.
Get a mirror and massage oil before starting the procedure. This will help you keep track of whether you are executing the movements correctly, as well as avoid additional friction. Also, your skin should be clean.
Massage is prohibited if you have ENT disorders, lymphatic system disorders, chronic skin conditions, or facial wounds.
You should rub and press your face very hard, but without creating any painful sensations.
The Korugi massage contributes to weight loss on the face.
6. Cheek Lift
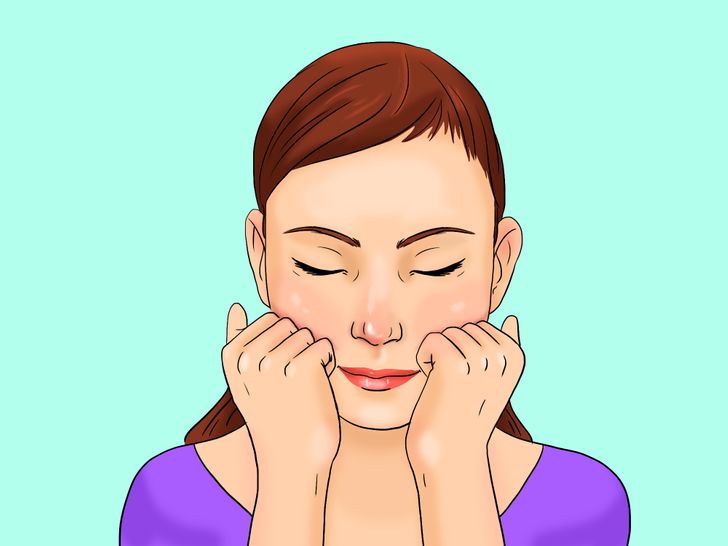
Place your elbows on the table. Make fists. Place them against your cheekbones with your fingers on your face. Your muscles should be relaxed. Stay in this position for 5 seconds.
5. Working With the Forehead

Turn your head back a little. Make fists. Press your forehead against the hairline with your middle knuckles. Keep pressing as you glide your hands to your temples and earlobes along your hairline. After that, slowly move your fingers down your neck until you reach your collarbone.
4. Smoothing the Cheeks
Keep your hands together, your thumbs should be straight as you will need your side to perform the exercise.
Place the tip of your right thumb under your left eye, near your nose. Make a sliding motion towards the ears, pressing against the skin. Then lightly slide your thumb along the neckline, from the earlobes to the collarbones. Repeat the last part of the exercise 2 times.
Do the same exercise on the right side of the face.
3. Smoothing the Forehead
Make fists. Place the joints of the middle finger slightly above the brow line and rub towards the hairline. Now move your hands to the starting position, but slightly to the sides and make a lifting movement once more, thus smoothing the entire surface of the forehead.
2. Working With the Lower Part of the Face
Make a fist and keep your index and middle fingers straight (but still bent at the middle joint). The movements must be performed with the help of these 2 fingers.
Press and pull the skin hard from the chin towards the temples. Start at the location below the corners of the mouth. The distance between pressing and pulling should be small. You must do 7-8 movements in total.
1. Finishing the Massage
Open your palms. Place your fingers on your forehead and gently slide them towards your temples.
After that, slowly slide your fingers from the cheeks to the collarbones, along the side of the neckline.
Perform this massage once a week for best results.
Bonus:
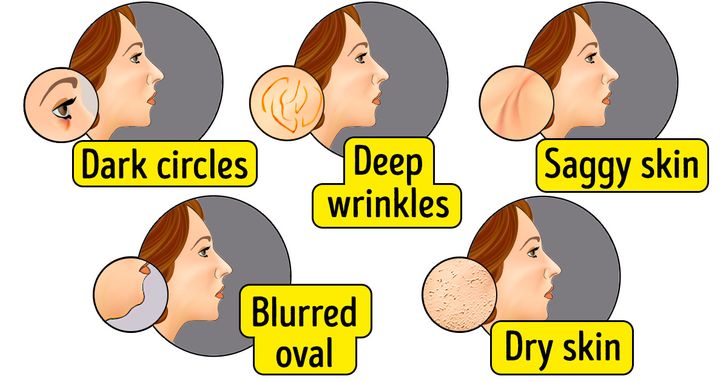
The good news is that, in addition to the main objective of this massage, it also provides a number of other benefits:
- Eliminates fatigue and dark circles, illuminating the face;
- As the skin becomes more elastic, it even contributes to the removal of deep wrinkles;
- Sagging skin becomes smoother and more luminous;
- The oval of the general face becomes more precise, which makes the features much sharper;
- Better blood circulation promotes better skin conditions.
Preview photo credit depositphotos.com


